
What should businesses expect from a commercial property photography shoot?
Ever wonder why some listings sit on the market for months while others seem to spark bidding wars within hours? In the competitive world of commercial real estate photography, the difference is rarely just the price—it’s the presentation.
High-stakes properties require more than just a quick snapshot; they require a visual narrative that speaks to potential investors, tenants, and stakeholders before they even step foot on the premises.
The problem is that many businesses settle for mediocre commercial real estate images that fail to capture the scale, functionality, or unique "vibe" of a space. Dark corners, distorted angles, and flat lighting don't just look unprofessional—they actively devalue your brand and lead to missed opportunities in a fast-moving market. When your visual assets don't match the quality of the property itself, you're leaving money on the table.
In this guide, we will break down exactly what you should expect from a professional commercial property photography shoot, from the initial walkthrough to the final polished delivery. You'll gain expert commercial real estate photography tips to help you prepare your space and ensure your assets stand out.
Let’s dive into how you can transform your property into a high-converting visual masterpiece.
Understanding the Impact of Professional Commercial Real Estate Photography
At its core, commercial property photography is the specialized process of capturing high-quality, strategic imagery of business-oriented spaces—such as office buildings, retail centers, industrial warehouses, and luxury developments.
Unlike residential photography, which focuses on the "feeling of home," commercial photography focuses on the property’s architectural integrity, its surrounding infrastructure, and its potential for ROI. It is a visual representation of a business asset designed to attract high-value clients and investors.
In today’s digital-first market, these images are often the first (and sometimes only) impression a stakeholder gets. High-quality commercial real estate pictures are vital because they establish immediate credibility.
Without professional-grade visuals, you risk your property being overlooked in a sea of listings, leading to longer vacancies and diminished perceived value. High-quality photography translates to a faster sales cycle and a more professional brand image for your firm.
Investing in expert photography offers several key advantages:
- Commands Premium Pricing: Professional visuals justify higher lease rates and sale prices.
- Showcases Scale and Utility: Expertly framed shots highlight the functionality and square footage of a space.
- Enhances Digital Presence: Optimized images improve engagement on platforms like CoStar, LoopNet, and social media.
- Builds Trust: Clear, detailed photos reduce uncertainty for out-of-state investors.
A common misconception is that a high-end smartphone is "good enough" for commercial listings. However, capturing the true depth of a 50,000-square-foot warehouse or the intricate lighting of a modern lobby requires specialized wide-angle lenses and advanced post-processing techniques that only a professional can provide.
What to Expect During Your Commercial Property Photography Session
When you hire a professional for your commercial property photography, you aren't just paying for someone to show up with a camera; you are investing in a structured, multi-stage process designed to showcase your asset in its best possible light. Understanding this process ensures that you can prepare your team and your property for a seamless experience.
Here is a step-by-step breakdown of what a standard high-end shoot looks like.
Step 1: The Pre-Shoot Consultation and Walkthrough
The foundation of a successful shoot is a clear strategy. Before any shutter clicks, we establish the goals of the project to ensure the final commercial real estate images align with your marketing objectives.
During this phase, we discuss the "hero shots"—those high-impact images of the building exterior or main lobby—and identify any specific architectural details or amenities that need highlighting. We also evaluate the sun’s path to determine the optimal time of day for exterior shots.
Pro Tip: Inform your tenants or staff of the shoot date at least 48 hours in advance to ensure common areas are clear and parking lots aren't overcrowded.
Step 2: Property Staging and On-Site Prep
Once on-site, the photographer will do a final "sweep" of the areas being photographed. Unlike residential shoots, commercial real estate photography requires a focus on symmetry, cleanliness, and professionalism.
This involves hiding unsightly items like trash cans, loose cables, or cluttered desks. We ensure that blinds are uniform, lights are functioning, and the space looks "open for business." This step is crucial because even a small distraction can pull a viewer's eye away from the property's value.
Step 3: Interior and Exterior Capturing
This is the technical heart of the session. A professional will use specialized equipment, such as tilt-shift lenses, to prevent the "leaning building" effect common in amateur photos.
The photographer will capture a mix of wide-angle shots to show the scale of the floor plan and "vignette" shots that highlight premium finishes or unique design elements. For the exterior, we often utilize drone photography to provide a "bird's eye" view of the property's location and its proximity to major highways or local landmarks.
- Interiors: Focus on depth, natural light, and flow.
- Exteriors: Focus on curb appeal, signage, and structural presence.
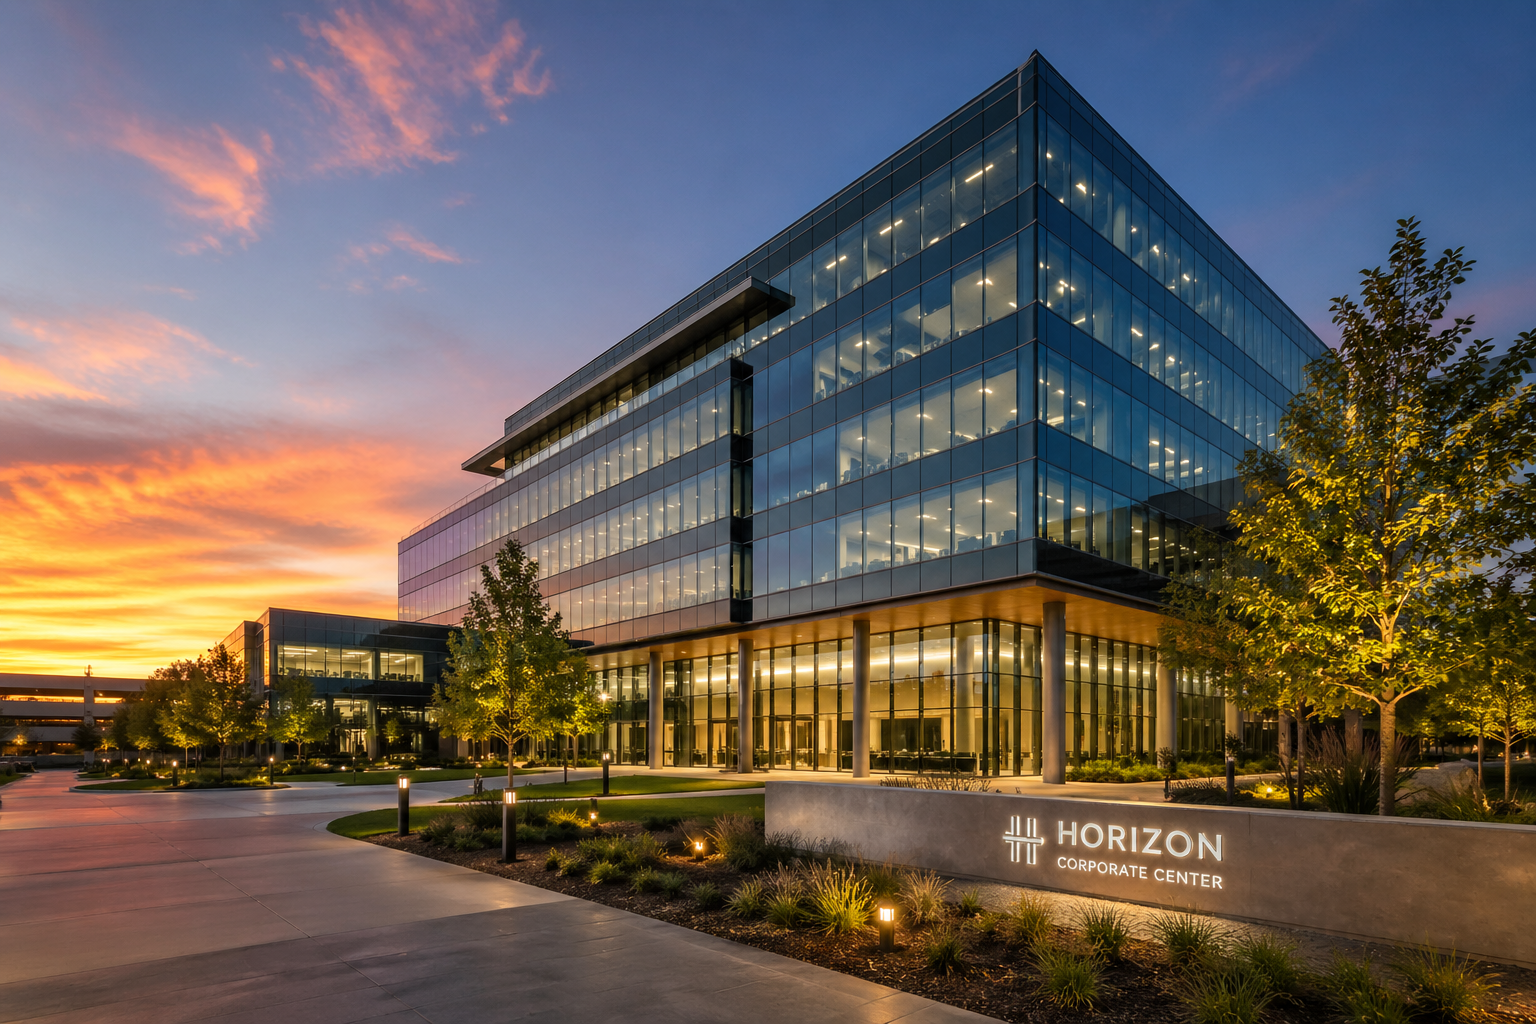
Step 4: Specialized Lighting and "Twilight" Sessions
Depending on your package, we may stay for a Real Twilight session. This is often the most important part of commercial property photography.
As the sun sets, we use a mix of ambient light and long-exposure techniques to make the building "glow." This creates a high-end, prestigious look that is proven to grab more attention on digital listing platforms. If a live twilight shoot isn't possible, Virtual Twilight can be used to achieve a similar effect in post-processing.
Step 5: Professional Post-Processing and Editing
The shoot doesn't end when the photographer leaves the site. The raw images go through an intensive editing process to ensure colors are accurate and the dynamic range is balanced.
We correct lens distortions, enhance blue skies, and perform "object removal" for minor distractions like stray leaves or temporary signage. The goal is to produce commercial real estate pictures that look clean, vibrant, and true to life, yet better than the naked eye might perceive on a cloudy day.
Step 6: Delivery and Implementation
Finally, you receive your high-resolution digital assets via a secure gallery. These files are typically provided in two formats: high-resolution for print (brochures, banners) and web-optimized for fast loading on your website or listing portals.
Once you have these assets, you can immediately begin integrating them into your marketing collateral to start driving leads and inquiries.
Maximizing Your ROI: Commercial Real Estate Photography Tips in Action
Now that you understand the mechanics of a professional shoot, let’s look at how commercial real estate photography translates into tangible business results across different sectors. Seeing the application in practice helps clarify which services—from land and lot shots to video portfolios—best suit your needs.
- Retail and Hospitality: A boutique shopping center struggling with high vacancy rates utilized a full suite of commercial real estate images, including drone vistas and evening twilight shots.
By showcasing the vibrant nighttime lighting and the proximity to high-traffic anchors, the leasing agent increased digital inquiries by 40%, securing two new national tenants within three months.
- Industrial and Warehouse Spaces: A logistics firm needed to market a 100,000-square-foot distribution center to out-of-state investors. By using high-angle commercial property photography to emphasize ceiling height, dock door accessibility, and expansive turn-radii, they provided the technical visual data investors required. This transparency led to a sight-unseen offer that closed 15% faster than the local market average.
- Corporate Office Portfolios: Property managers for Class-A office spaces often use professional photography to refresh their rental properties listings. High-quality imagery of shared amenities and modern lobbies helps redefine the "work-from-home" narrative, successfully drawing corporate teams back to physical headquarters.
These examples prove that whether you are selling a vacant lot or leasing a skyscraper, professional visuals are the most effective tool in your marketing arsenal.
Expert Commercial Real Estate Photography Tips for a Flawless Shoot
Once you’ve booked your session, a few expert preparation techniques can ensure you maximize your investment and walk away with a stunning portfolio. This transition from planning to execution is where the most successful property managers truly shine.
- Audit Your Exterior Curb Appeal: Before the photographer arrives, ensure the landscaping is manicured, windows are washed, and the parking lot is free of debris.
Commercial property photography relies heavily on first impressions; for instance, a stray trash bin or a collection of dead leaves in the entryway can distract a viewer from the building’s architectural beauty.
- Synchronize Your Lighting: Walk through the property to ensure every single light bulb is working and shares a consistent color temperature. In commercial real estate photography, "mixed lighting"—where some bulbs are warm yellow and others are cool white—can create muddy, unprofessional colors in the final images. Ensuring uniformity creates a clean, high-end look throughout the space.
- Declutter for Depth and Scale: Remove all temporary signage, personal desk items, and seasonal decorations. A clean, "neutral" space allows potential tenants to visualize their own business within the walls.
For example, clearing a lobby of dated brochures and cluttered reception desks makes the area feel significantly more spacious and modern in commercial real estate pictures.
- Coordinate with Property Operations: Ensure all fountains are running, flags are raised, and security gates are positioned exactly how you want them. These small operational details contribute to the "prestige" of the shot.
Having the HVAC or maintenance team on standby can also help if you need to quickly adjust blinds or access locked rooftop areas for better vantage points.
By applying these tips, you’ll not only streamline the shoot day but also ensure your final assets are as polished and persuasive as possible.
Your Partner in Professional Commercial Property Photography
From the initial walkthrough to the final high-resolution delivery, you now have a roadmap of what to expect from a professional commercial property photography shoot. You’ve seen how strategic visuals—from commercial real estate images to specialized real twilight sessions—act as a powerful catalyst for faster leases, higher sale prices, and a more authoritative brand presence.
Don't let your property settle for anything less than perfection. The most successful businesses understand that their digital storefront is just as important as their physical one, and high-quality photography is the cornerstone of that presence. Start implementing these realty photography tips today and watch how a professional lens can transform your marketing outcomes.
Ready to elevate your property's profile and capture its true value? Explore our comprehensive commercial properties services to see how we can bring your vision to life, or check out our video portfolio for an even more immersive look at your next project.
Frequently Asked Questions About Commercial Property Photography
What is included in a commercial property photography package?
A standard package typically includes a pre-shoot consultation, professional on-site capturing of interiors and exteriors, and high-end post-processing. At Brookehaven Media, we often incorporate specialized equipment like tilt-shift lenses and offer add-ons like drone photography or virtual twilight to ensure your commercial real estate images stand out on competitive listing platforms.
How long does a commercial real estate photography shoot take?
The duration depends on the property size and complexity, but most shoots take between two to six hours. A small retail space might be finished quickly, while a large industrial complex or multi-unit residential property requires more time to capture various angles and lighting conditions. We work efficiently to minimize disruption to your daily business operations.
Why should I hire a professional for commercial real estate pictures?
Professional photographers understand how to manage challenging lighting and vertical lines that smartphone cameras simply cannot handle. High-quality commercial property photography builds immediate trust with investors and high-value tenants. It ensures your property is portrayed as a premium asset, which is essential for justifying higher lease rates and achieving a faster turnaround in the market.
How should I prepare my building for a photography session?
Preparation is key to a successful shoot. Focus on cleaning all windows, decluttering common areas, and ensuring all interior and exterior lighting is functional and consistent. Following these realty photography tips—such as clearing the parking lot and hiding trash receptacles—allows the photographer to focus on the architecture and flow of the space rather than fixing avoidable distractions in post-production.